Step 1Create Your Account and Log In
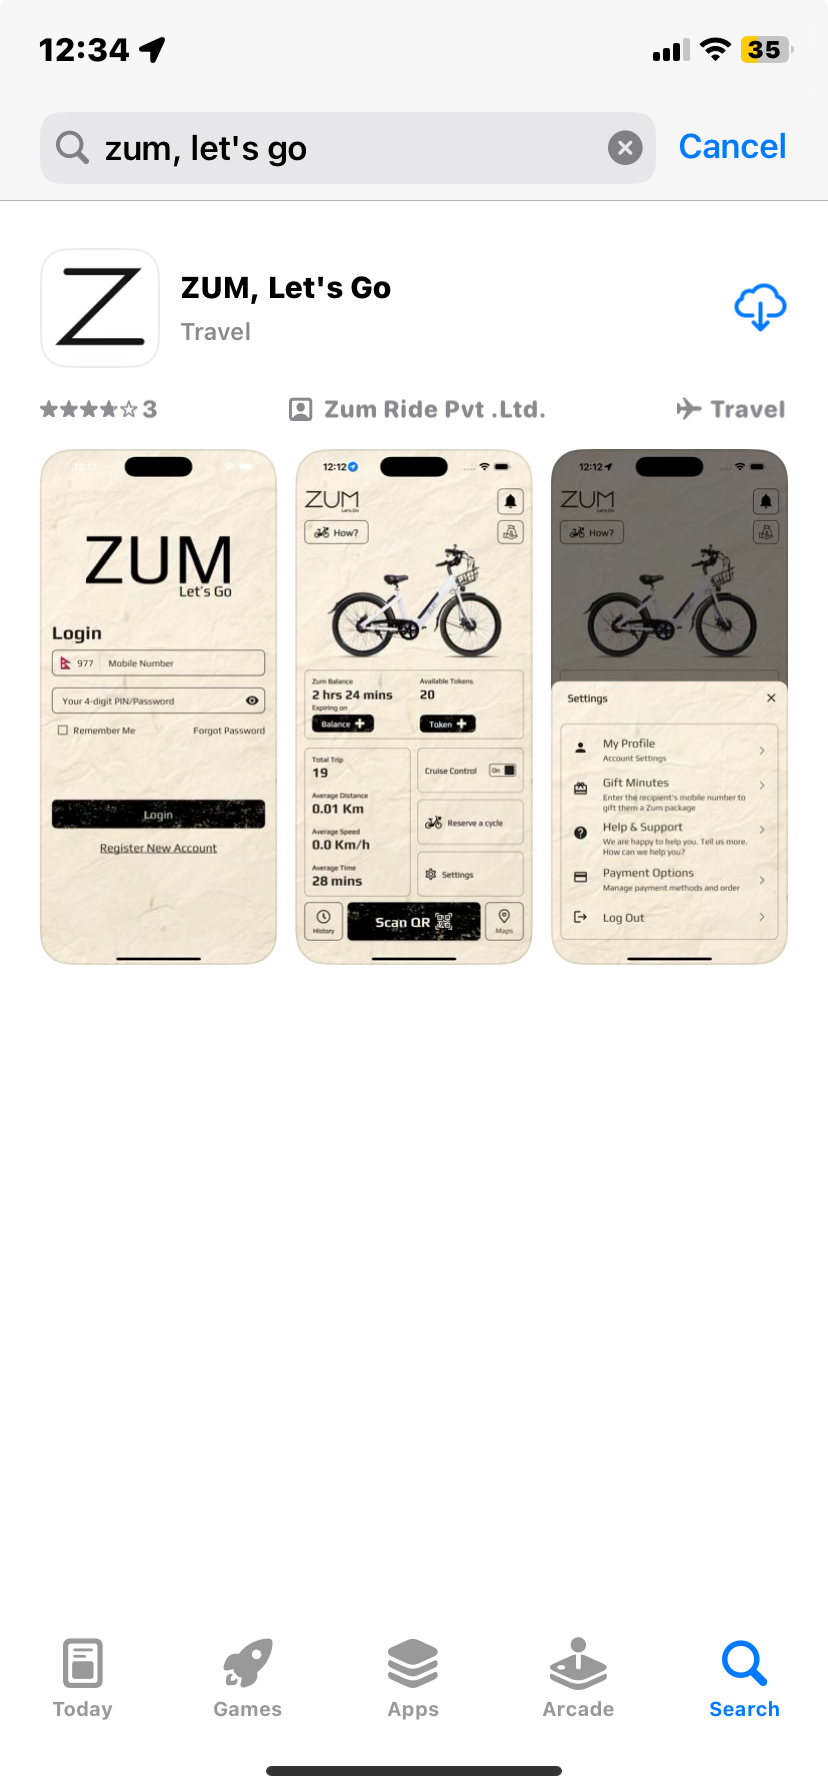
The sign-up and login screens are the same place in Zum. When you first open the app you'll see two options, Sign Up if you're new, and Log In if you already have an account.
Creating a new account
1
Download Zum and open it
Available on the iOS App Store and Google Play Store. Opening the app takes you straight to the sign-up and login screen.
2
Fill in your details
Enter your full name, email address, phone number, and a password. Confirm the password to continue.
3
Verify your phone via OTP
A one-time code is sent to your phone number. Enter it in the app to confirm your number belongs to you.
4
Email Verification
Enter your email address to receive a verification OTP or link. You must verify your email before proceeding with the account setup.
5
Account created
Your account has been successfully created.
6
Log in with your number and password
Enter your phone number or username and the password you just set, then tap Log In. You'll land on the home screen every time you open the app from here on.
Logging back in
Tap Log In on the same screen. Enter your registered phone number and password, then tap Log In. Zum keeps you logged in automatically, you'll rarely need to do this unless you've logged out manually.
Forgot PasswordReset in under a minute
Tap Forgot Password on the login screen. Enter your registered phone number, receive an OTP, and set a new password immediately.
Biometric LoginFingerprint or Face ID
Enable biometric login in Settings after signing up. From then on, one touch or glance gets you straight into the app, no typing needed.
Privacy Note: Your Face ID or Fingerprint data is NOT stored by Zum; it is handled securely by your device's operating system.
🔒 Account LockWhy It Happens
Zum locks your account after 3 consecutive incorrect login attempts (wrong phone number or wrong password). This protects your account from unauthorised access. You have exactly three chances before the lock kicks in.
How to Avoid ItStay logged in, skip the password
Enable Biometric Login in Settings after signing up — a fingerprint or face scan gets you straight in without typing anything. Alternatively, tick Remember Me on the login screen and Zum keeps you logged in automatically so you never need to re-enter your credentials.
Account Locked?Contact the Zum Team
A locked account cannot be unlocked by the user — it requires the Zum team to resolve it. Tap Help and Support at the bottom of the login page and report your locked account. The team will get it sorted for you.
Happens AutomaticallyGuided Tour: It Starts the Moment You Sign Up
You don't need to find or launch the Guided Tour; it appears only on your first login after creating your account. The moment you're in, the app walks you through every screen and button one step at a time, with a short explanation at each one. You'll need to tap at the exact spot — taps only register once the animation at each step finishes and the click icon appears. Only that specific area is tappable, and only after the animation completes, so watch for the icon before tapping. You can access it later anytime via Settings → Guided Tour .
First Launch✦ Launches automatically
Right after signup, the Guided Tour starts by itself. It takes you through the home screen, balance, tokens, ride controls, and settings in a logical sequence, so your first real ride has no surprises.
Want to replay it?Settings → Guided Tour
The tour lives in Settings permanently. Go back to it any time, after an app update, if you forgot something, or to help a friend who's just joined. It's always there, as many times as you need it.
Start HereHelp: Your Starting Point
Tap Help on the home screen before you do anything else. The Help section brings together everything you need to get started in one place.
🤝
Help and Support
The Help section gives you direct access to Help and Support. Report an issue, ask a question, or contact the Zum team without leaving the app.
📱
App Manual
A complete written guide to the Zum app, covering every screen and feature. The same content as this manual, accessible directly inside the app any time you need a reference.
🎬
Help Videos
Multiple short videos covering every key action in the app are available here and can be accessed any time. Watch them once before your first ride and come back whenever you need a refresher.
📌 Help and Support is in two places: here in the Help section, and inside Settings then Help and Support. Both open the same support form, so use whichever is faster to reach.
Required for the App to WorkLocation: Enable It Before You Ride
Zum is a location-based service. The app needs access to your phone's location at all times while you are using it, otherwise core features like the live map, station finder, geofence, and ride tracking simply will not work.
📍
Why Location Is Needed
Location is used to show nearby cycles and stations on the map, track your ride in real time, enforce the ride zone (geofence) boundaries, verify your photo location when ending a ride outside a station, and send you accurate alerts based on where you are.
⚙️
How to Enable
When you first open Zum, the app asks for location permission. Tap Allow (or Allow While Using App). If you missed the prompt or denied it, go to your phone Settings > Apps > Zum > Permissions > Location and select Allow all the time or Allow while using the app.
🛰️
Keep GPS On
Make sure your phone GPS / Location service is switched on from the quick settings panel. If GPS is off at the phone level, granting permission to Zum alone is not enough, the app still cannot read your location.
📱 Same steps for iOS and Android: The location permission process above applies to both iPhone and Android. The screen may look slightly different depending on your device, but the steps and options are identical on both platforms.
⚠️ If location is not enabled: The map will be blank or stuck, you will not be able to scan, reserve, start, or end a ride, and you may receive a push notification asking you to enable location before continuing. Pop-up stations and nearby cycles also will not show up.
🔋 Battery note: Zum uses location only while the app is in use, so battery impact is minimal. We do not track your location when you are not riding or actively using the app.
Step 2 · One-Time OnlyKYC: Prove Who You Are, Just Once
KYC stands for Know Your Customer . It's a one-time identity check that every Zum rider has to complete before their first ride. Once approved you never have to do it again.
Fastest MethodVia Nagarik App
Quick KYC is done through the Zum website. Open the Zum website, select Quick KYC, and scan the QR shown using your Nagarik App. Your details are pulled in automatically — nothing to type manually.
Alternative MethodManually
Upload a photo of your NID, Driving License, or Citizenship, plus a clear photo of yourself. The Zum team reviews it and approves it.
1
Choose your verification method
Nagarik App: scan the QR and your details come in automatically. Manual: fill in your details and upload your document and photo inside the app.
2
Fill in your KYC inside the app
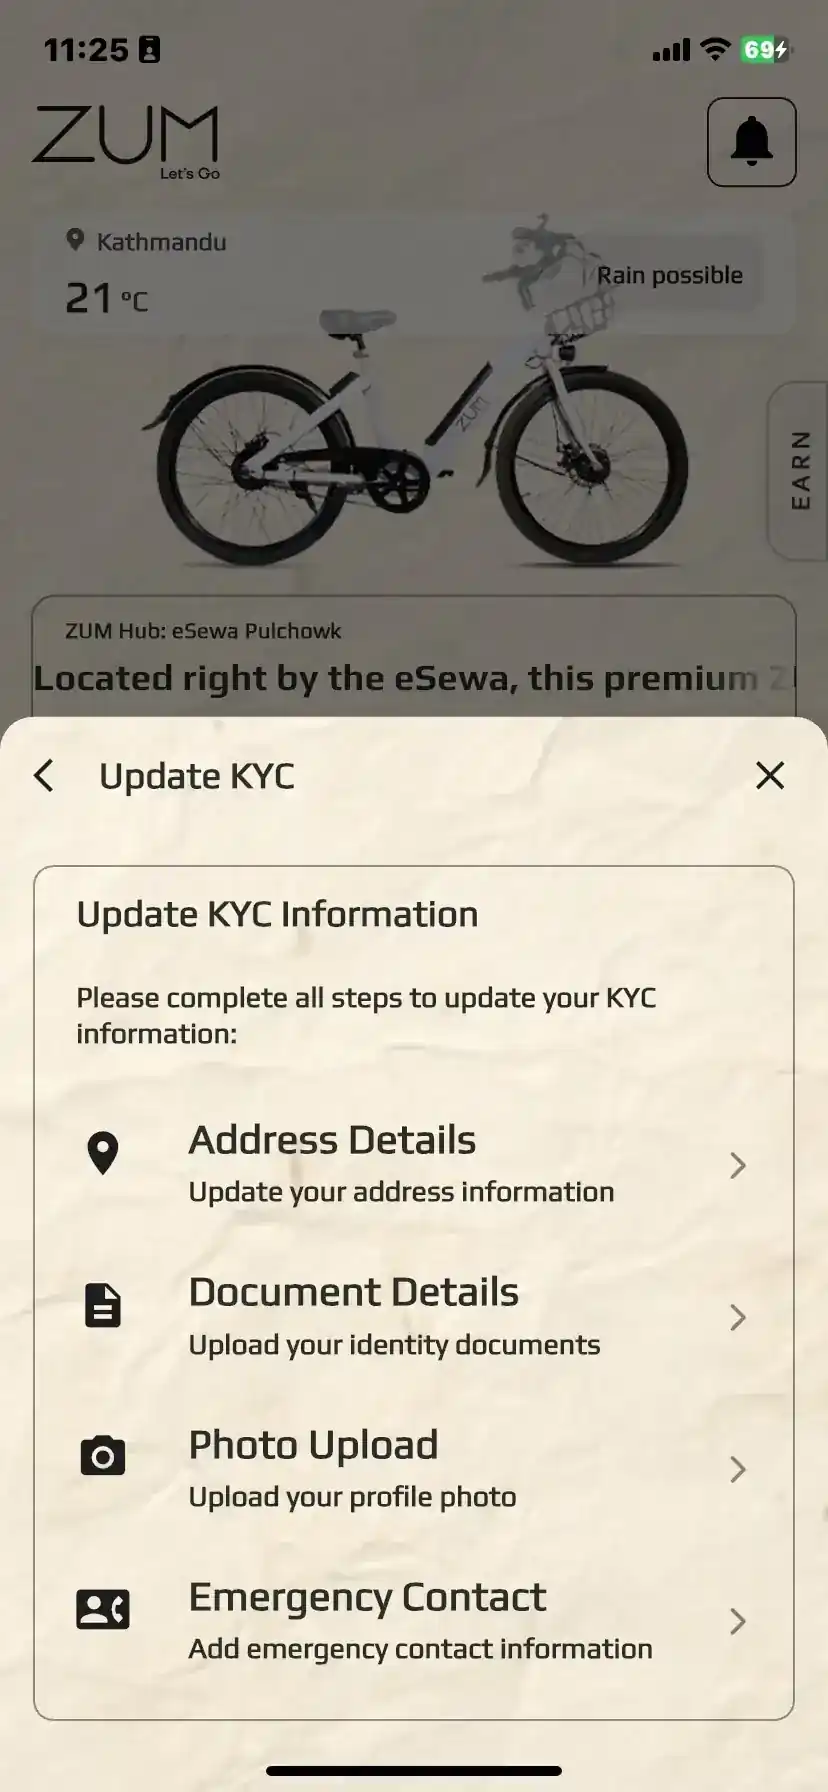
Right after you log in, a KYC pop-up appears. Tapping any button on that pop-up takes you straight into the KYC form, where you fill in:
• Address details
• Document details
• Photo of your License, Citizenship, Passport, or National Identity — both front and back
• Photo upload — a clear photo of your face
• Emergency contact — relationship with you and phone number
3
Wait for approval
The Zum team reviews your submission. You'll get a notification once it's approved and your full app access is unlocked.
Before KYC Approval
While your KYC is pending or has not yet been submitted, your access to the app is intentionally limited. Here is what you can and cannot do at this stage.
✅ Available before KYCHelp button
The Help section on the home screen is fully accessible. You can browse the app manual, watch all tutorial videos, and contact Help and Support at any time, even before KYC is approved. This lets you learn the app and get any questions answered before your first ride.
✅ Available before KYCNotification and Chat
Alerts and the support chat inside the notification and chat are also active before KYC. You will receive status updates about your KYC submission and can message the Zum team directly if you need help with your documents or verification.
🚫 Not available before KYCLocked Features
Starting a ride, reserving a cycle, topping up balance, purchasing tokens, and accessing payment options are all locked until KYC is approved. The app will prompt you to complete KYC if you attempt any of these actions.
After KYC Approval
Once the Zum team approves your KYC submission, you receive a notification and full app access is immediately unlocked. Every feature in the app becomes available with no further steps required.
✅ Unlocked after KYCEverything Becomes Available
Scan QR and start a ride, reserve a cycle, top up Zum balance, purchase tokens, set up payment options, use utility services, gift minutes, and access all settings including subscription management. Everything in this manual becomes available to you the moment KYC is approved.
🔒 Why does Zum need this? Every Zum cycle is a shared asset. KYC makes sure every rider on the network is a real, accountable person. It protects you, other riders, and the bikes themselves — and it lets us comply with insurance claims and identify riders for the SOS feature or any legal issues that may come up. One step, done once.
Need to update your details later?
You can go back to Settings > My Profile > Account > Update KYC at any time to update your address, documents, photo, or emergency contact. Changes are reviewed before they take effect.
Your Access to Zum
How access works
Completing your KYC is the first step — but it does not immediately give you access to purchase a package and start riding. Zum launches with a limited fleet, and to make sure every rider who purchases a package can actually find a cycle when they need one, access is made available in waves.
Once your KYC is approved, you are in line. When an access window opens for you, you will receive a notification in the app. At that point, the option to purchase a package becomes active and you can get started. Until then, no further action is needed on your part.
📌Act promptly when you receive your notification. Access windows are limited and open periodically — if you miss yours, a new access window will open after a certain time and you will be notified when it does.
What access gives you
Once you have access and purchase a package, everything in the app becomes available to you — riding, top-ups, tokens, the Day Package, and all other features. Your access is tied to you as a rider, not to any single package. When your package expires, simply purchase another one when you're ready.
Why access works this way
Zum keeps access windows matched to the available fleet. This means when you need a cycle, one is there for you. As the fleet grows, access opens up to more riders over time.
Your DashboardHome Screen: Everything You See When You Open the App
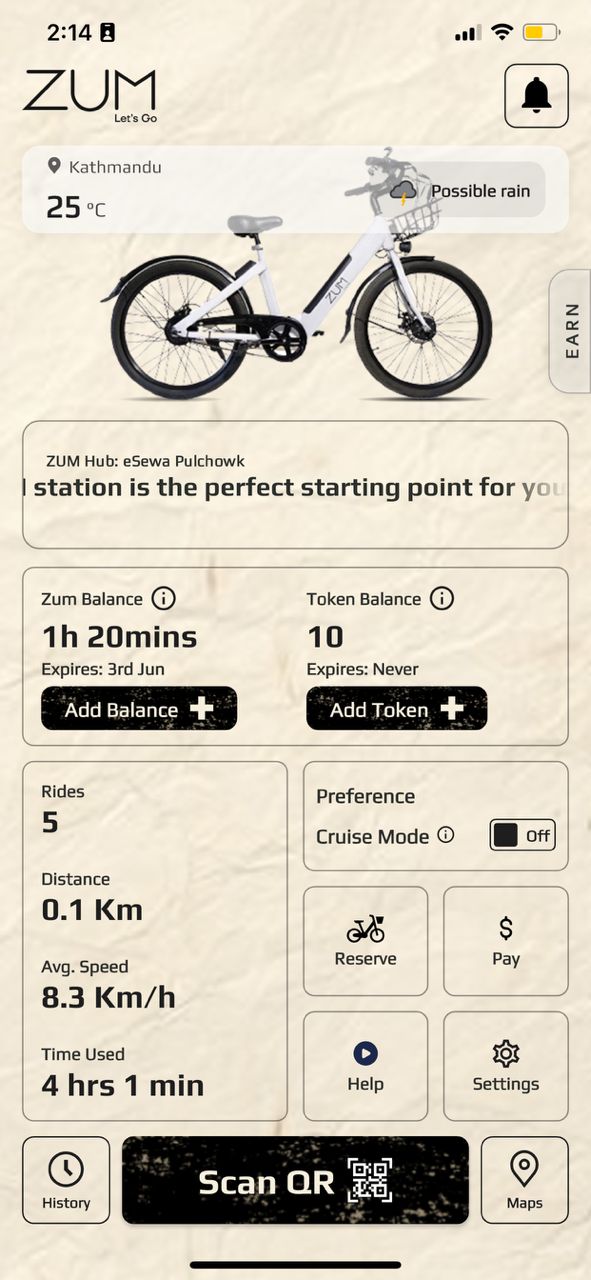
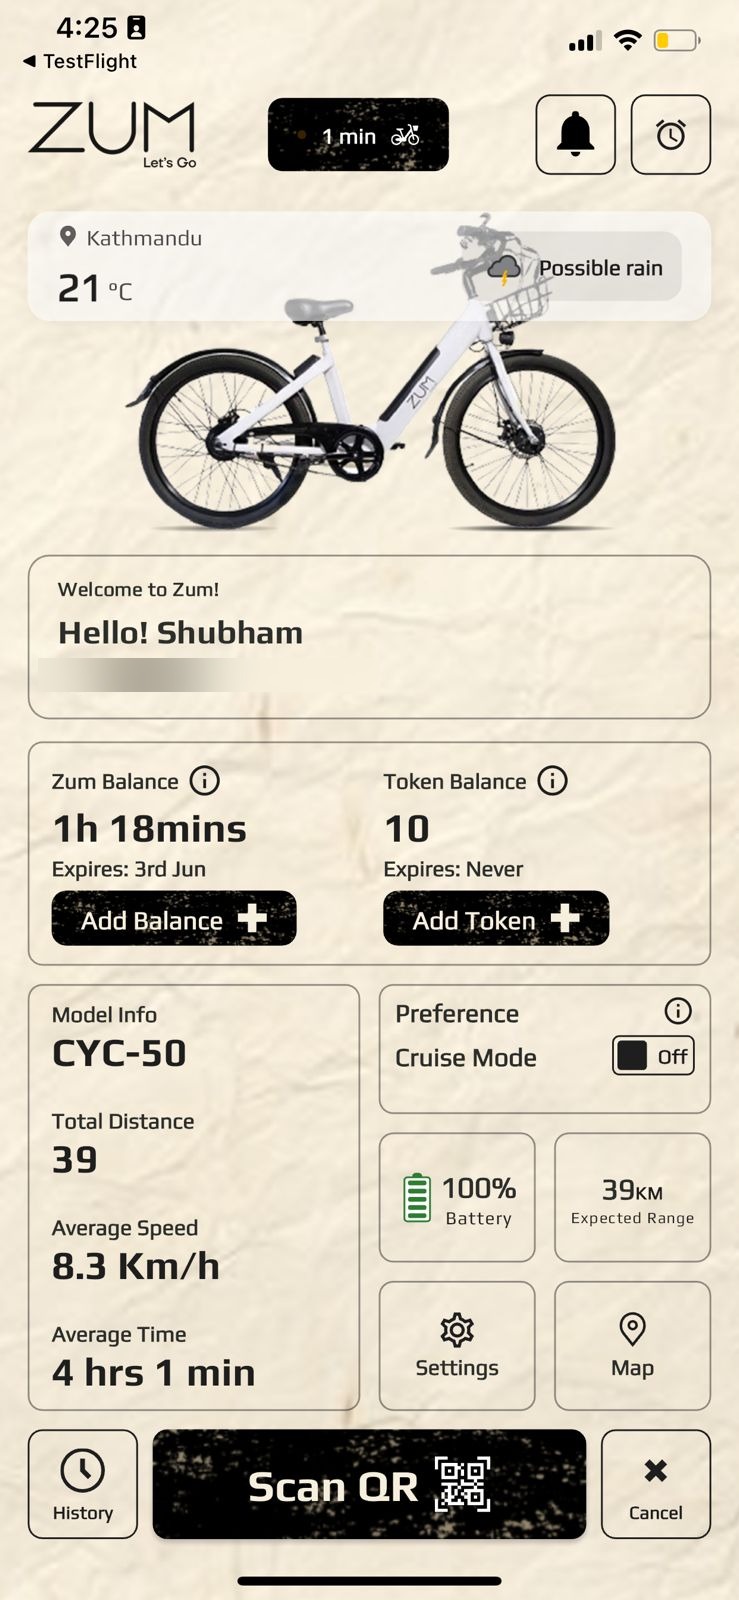
This is the screen you'll spend most of your time on. Every number, button, and section here has a specific job. Here's exactly what each part does.
Your entire ride life, on one screen
Balance, stats, quick actions, and the Scan QR button to start any ride, all visible without opening a single sub-menu.
💡 Every box on this screen is a button. The Balance box, Token box, Preferences box, Message Board, and each Quick Action button are all tappable. Tap any box to open it, interact with it, or get more detail.
Top Bar
✦
ZUM Logo: Home Button
Top left corner. The ZUM logo is a functional home button — tap it from anywhere in the app to jump straight back to the home screen. No matter how deep you are in Settings, Payments, or any sub-menu, one tap returns you to your dashboard.
🔔
Notification and Chat: Alerts, Support & Direct Chat
Top right corner. This does two things. First, it shows all your notifications — low balance warnings, KYC updates, ride confirmations, and announcements. Second, it gives you a direct line to the Zum support and communication team — tap the icon, open the chat, and message us from within the app. The chat supports the Tap & Talk feature for quick voice message, and photo uploads so you can share an image of the cycle, station, or any issue you are facing. Our team responds to help with ride issues, billing questions, account problems, or anything else you need. A dot appears on the icon whenever you have unread messages or alerts.
🌤️
Weather Card
Shows your current city, live temperature, and weather condition (e.g. Mist, Sunny, Rain). You can plan your rides ahead accordingly. Updates automatically based on your location. Tap the card to open a drawer with the weather forecast across the day, so you can plan your rides ahead.
Message Board
The scrollable card below the weather shows news from Zum, new hub openings, partnerships, promotions, and app updates. Swipe left and right or tap the arrows to flick through individual messages — the dots at the bottom show how many slides there are. Individual messages on the carousel are not clickable for more details. Tap the Message Board itself to open the full list, where every message is shown in a clean, scrollable list view. You can also filter messages by date to find announcements from a specific period.
Balance Card
⏱️
Zum Balance
Your available ride time shown in hours and minutes (e.g. 3hr 30 mins). This counts down while you are on a ride. The expiry date is shown below, top up before this date or unused minutes are lost. Tap Add Balance + directly on the home screen any time to buy more.
🪙
Token Balance
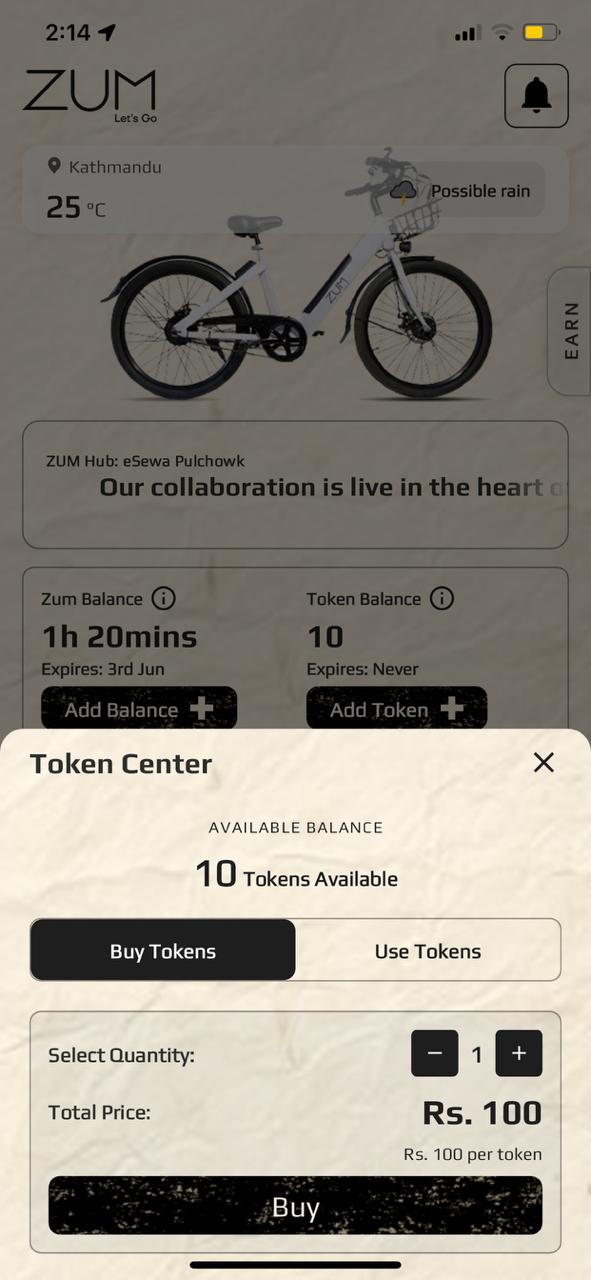
The number of tokens you currently hold (e.g. 4). Tokens never expire. They are used to end a ride outside a station, unlock certain features, and pay for services. Tap Add Token + directly on the home screen any time to buy more.
💡 Tap the ⓘ icon next to either balance label for a quick explanation of what that balance is and how it works, right there on the home screen without leaving the page.
Your Stats
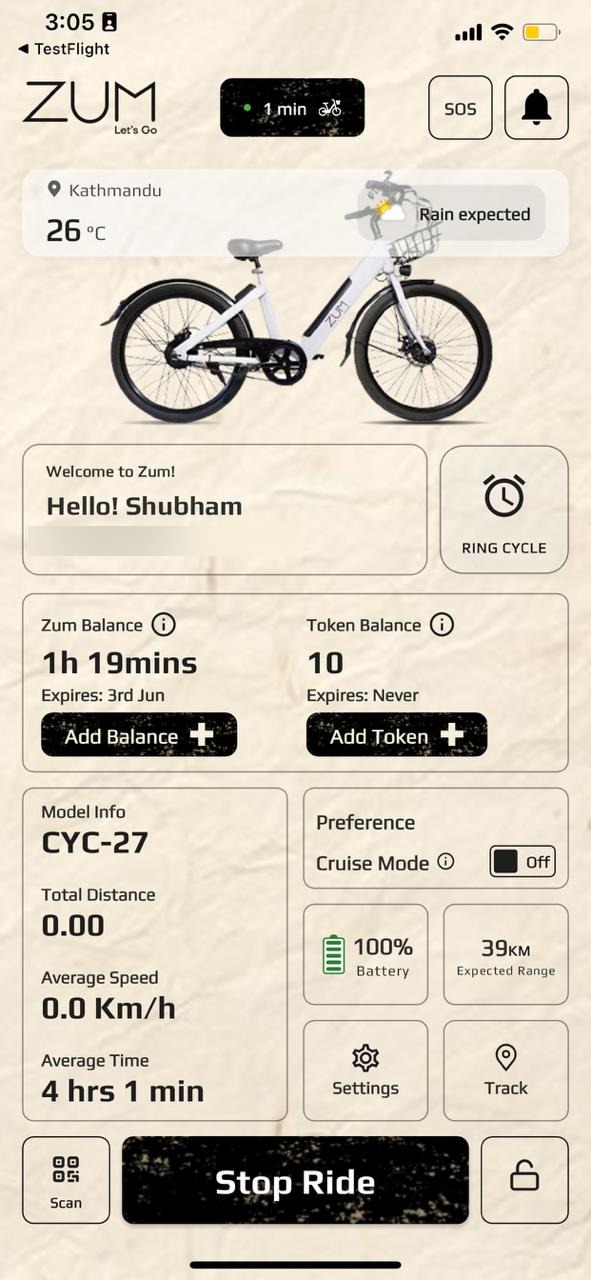
The Stats panel changes depending on where you are in the app. On the home screen it shows your lifetime totals and averages. On the active ride screen it switches to live numbers for the ride you are currently on.
⚪ Home Screen — lifetime totals
Total Rides
Rides taken so far
Total Distance
Total km ridden
Avg. Speed (Moving)
Across all rides
Time Used
Total time on a cycle
🟢 Active Ride Screen — live ride stats
Model Info
Assigned cycle model
Total Distance
This ride, live
Average Speed
Current ride km/h
Average Time
Time on this ride
Expected Range
km remaining
🟤 Booking Page — booked ride info
Model Info
Assigned cycle model
Total Distance
Cycle total km
Average Speed
Cycle avg km/h
Average Time
Cycle avg ride time
Expected Range
km remaining
Preferences
The Preferences box lets you control how your cycle behaves, both while you are riding and when you are away from it. Each setting has its own on/off toggle and saves automatically.
🚴
Cruise Mode
When on, the cycle maintains a steady motor-assisted speed automatically so you don't have to keep pedalling to sustain pace. When off, the motor only assists in short bursts as you pedal. Toggle this at any time, the setting takes effect on your next ride.
🔒
Auto-Lock if Phone is 200m Away
When on, if your phone moves more than 200 metres away from the cycle during an active ride, the cycle locks itself automatically. This protects against accidental separation, for example if you leave your phone somewhere or the cycle is moved without you. Turn this off only if you intentionally plan to leave your phone and cycle in different places.
⚡
Auto-End Ride When Cycle is Charging
When on, the app detects when your cycle has been plugged in to charge at a station and automatically ends your ride at that moment. This saves you from accidentally leaving a ride open while the bike is docked and charging. Recommended to keep this on at all times.
📡
Notify Me if Cycle is 500m Away
When on, you receive a push notification if your cycle travels more than 500 metres away from your phone's location. Useful if you park your cycle and walk away, any unexpected movement of the bike will alert you immediately so you can act quickly. The Zum app sends a notification to both the rider and the Support Center to lock the cycle.
🧪 Beta Version: The Preferences section is currently in beta. Features here are actively being developed and refined, so what you see may change as the app evolves. Your usage and feedback directly shape how these settings work in the final version.
Quick Action Buttons
📍
Reserve
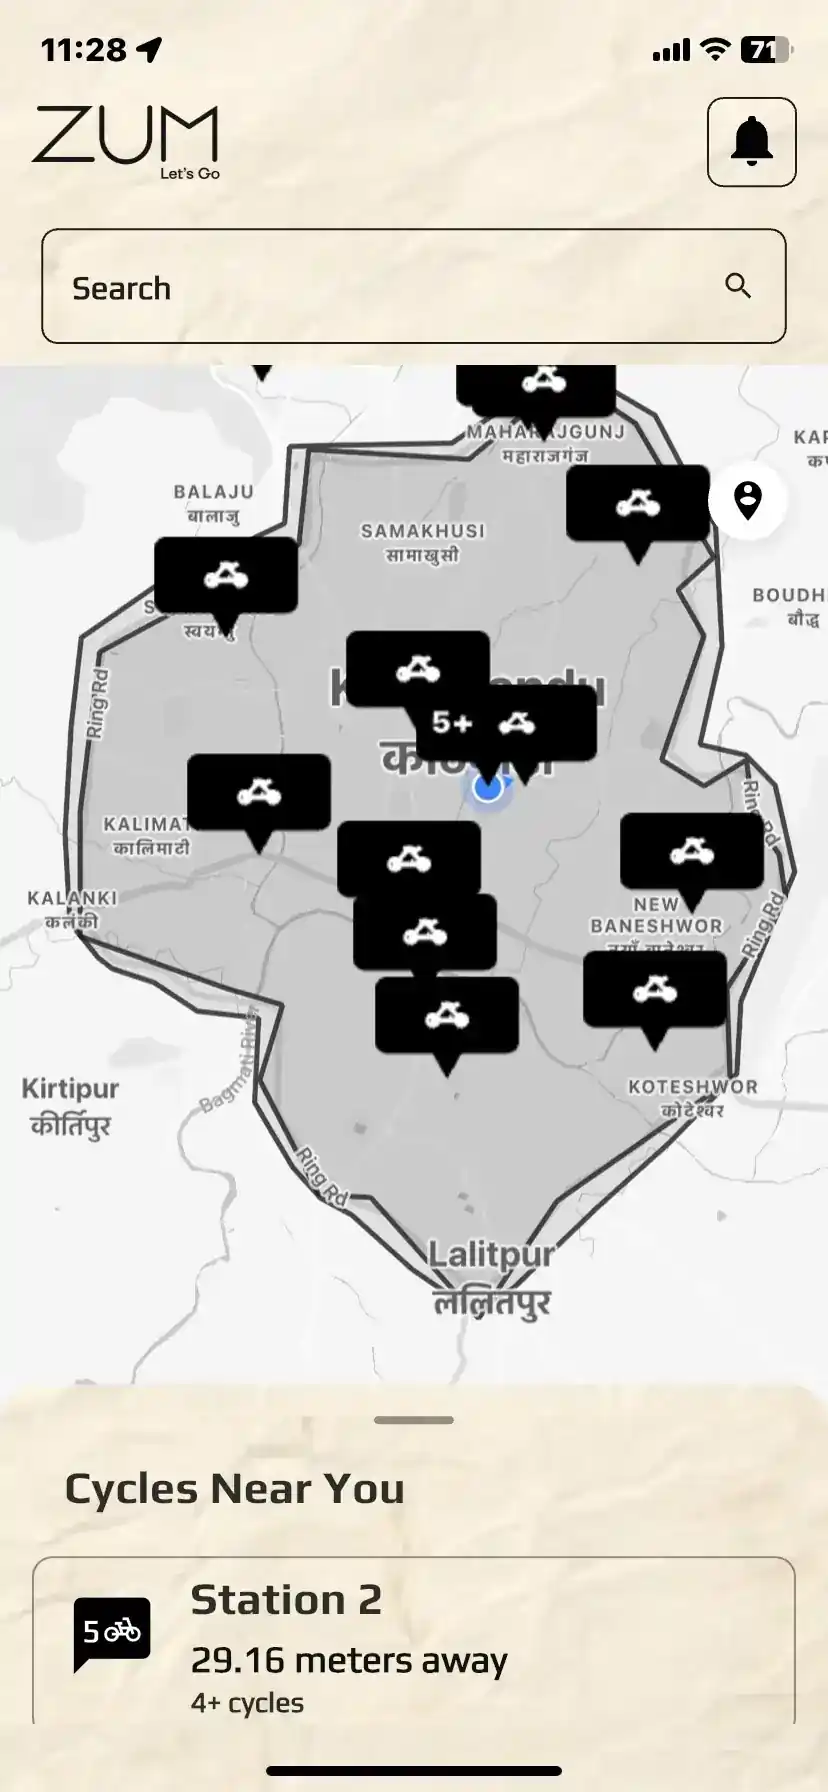
Opens the map showing all Zum stations across Kathmandu within the Ring Road. Each station shows how many cycles are currently available. Tap any station to reserve a cycle. The moment you reserve, your available Zum balance starts to count down, so we strongly suggest you reach the station in time. There is no specific time limit to reach the station — your reservation stays open — but every minute spent on the way is deducted from your balance.
💲
Pay, Utility Services
Opens a dedicated utility payments page, separate from your Zum Balance. From here you can pay electricity bills, mobile recharges, and other supported services directly through Zum using your saved payment methods. Bonus: every utility payment you make through the Zum app earns you bonus Zum minutes on top of the bill you pay — so paying your bills here also tops up your ride time at no extra cost.
▶️
Help
A shortcut to the same three resources you get inside the Help section, all in one place, in this order: Help and Support (report an issue, ask a question, or chat with the Zum team without leaving the app), the App Manual (the complete written guide to every screen and feature), and Help Videos (short clips showing you how to unlock a cycle, end a ride, add balance and more). Use this button any time you need a quick answer or a refresher.
⚙️
Settings
Opens your full settings menu, profile, KYC, payment options, notifications, biometric login, guided tour, manage packages, and more.
Bottom Navigation Bar
The three buttons at the very bottom of the screen behave differently depending on whether you have no active ride, an active ride in progress, or a reserved cycle on the way. Here is what each one shows in each state.
🕐
History
Left side of the bottom bar. Opens your full activity log inside Zum, organised into four tabs:
Rides: Every completed trip with date, duration, distance, start and end location, and balance used. Tap any entry for the full details of that ride.
Purchases: A record of all your top-ups, subscription payments, and utility bill payments made through the app, with date, amount, and payment method. Each purchase row has a Download button to download the invoice for that specific purchase. There is also a Download button on the bottom right of the screen to download the full purchase history — you can use the date filter to adjust which purchases are shown before downloading.
Minutes: A clear log of every minute added to or used from your Zum balance, so you can see exactly where your ride time has gone.
Tokens: A history of every token purchase, gift, and use, so you always know how your tokens have been spent.
📷
Scan QR
The large black button in the centre of the bottom bar.
Reserved State: If a cycle is reserved by another user, the cycle stays in a Locked state. If you scan it, you will be notified that the cycle is currently reserved by another user, so you can move on and try a different one.
Inactive: This is how every ride starts. Walk up to any Zum cycle, tap this button, point your camera at the QR code on the bike, and it unlocks immediately.
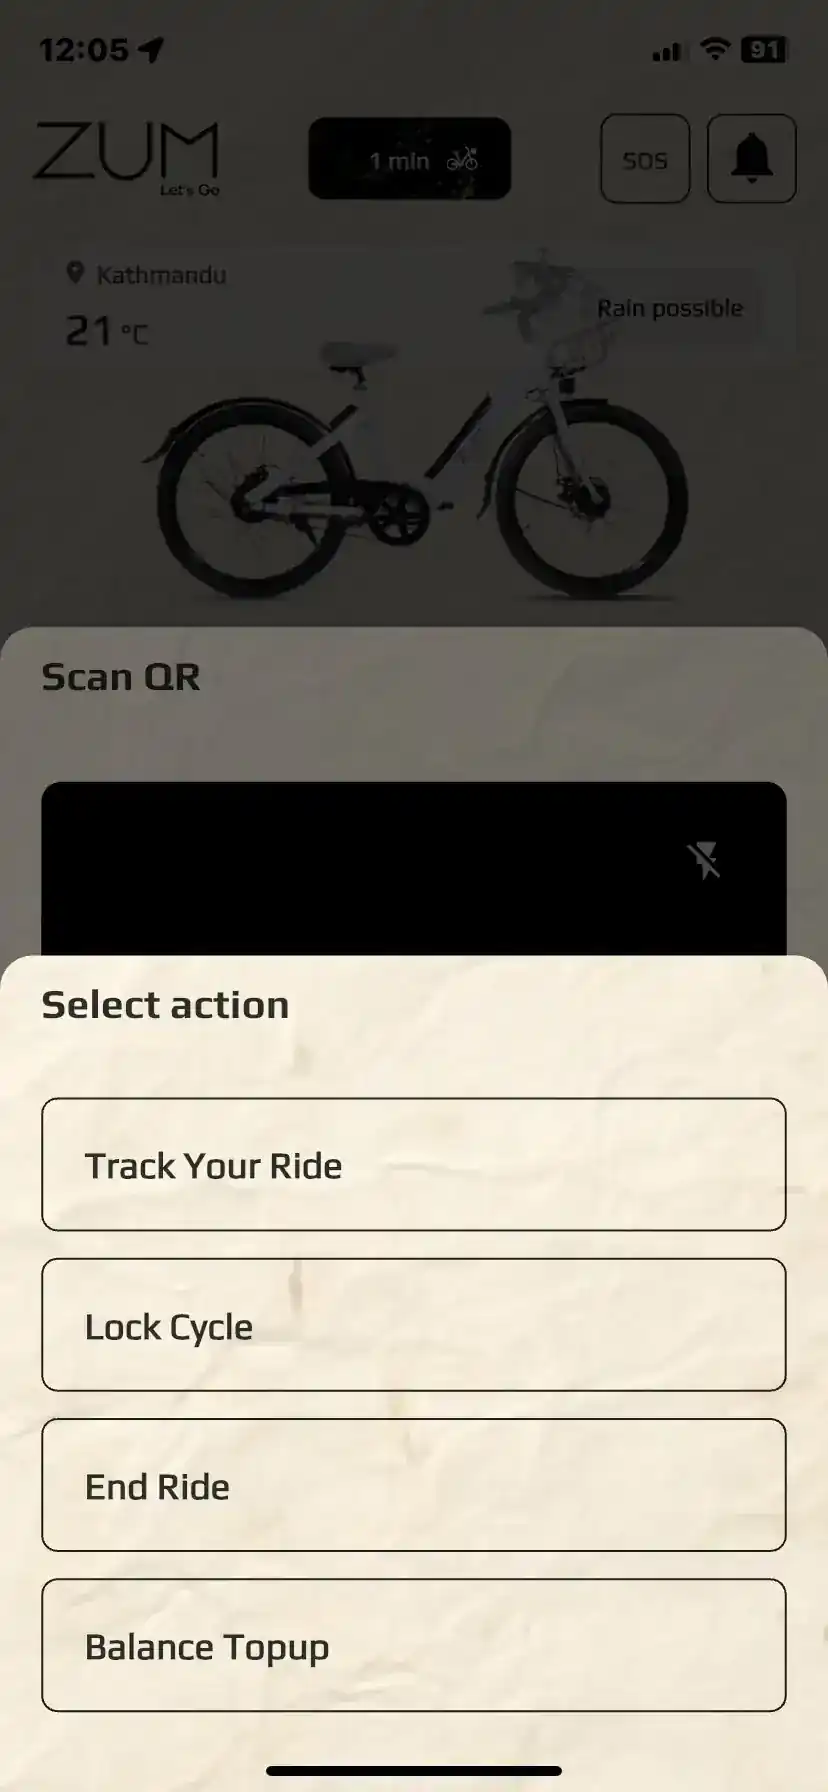
Active Ride: During a ride, tapping Scan QR on your own cycle opens the mid-ride menu, giving you access to Track Ride, Cruise Mode, Lock Cycle, Swap Battery, Top Up Balance, and End Ride.
Reserved Ride: While a cycle is reserved for you, this button scans the QR on your reserved cycle to confirm your arrival and start the ride immediately.
📍
Maps
Right side of the bottom bar.
Inactive: Opens the full Zum map of Kathmandu showing every station within the Ring Road with live cycle availability at each one. The inner and outer Ring Road boundaries are clearly marked so you can always see exactly where the ride zone starts and ends. Your live location is shown on the map so you always know your position relative to stations and zone boundaries.
Active Ride: Switches to your live ride map, showing your current position, the geofence boundary, your route traced in real time, and the nearest stations for ending your ride. The active ride map also shows where the cycle came from and where it is heading.
Reserved Ride: Shows the station where your reserved cycle is waiting, your current location, and the route to get there so you can head over promptly to save your Zum balance.
Note — Enable Location: You must allow location access while using the app. A mobile push notification will prompt you to enable it; if location is not enabled, the map will not be functional in Zum.
Note — Map Context: The active ride map and the home screen map work differently. The home screen map shows all stations and availability across the zone, while the active ride map is focused on your current ride context.
Your BalanceBalance: Your Ride Time in Minutes
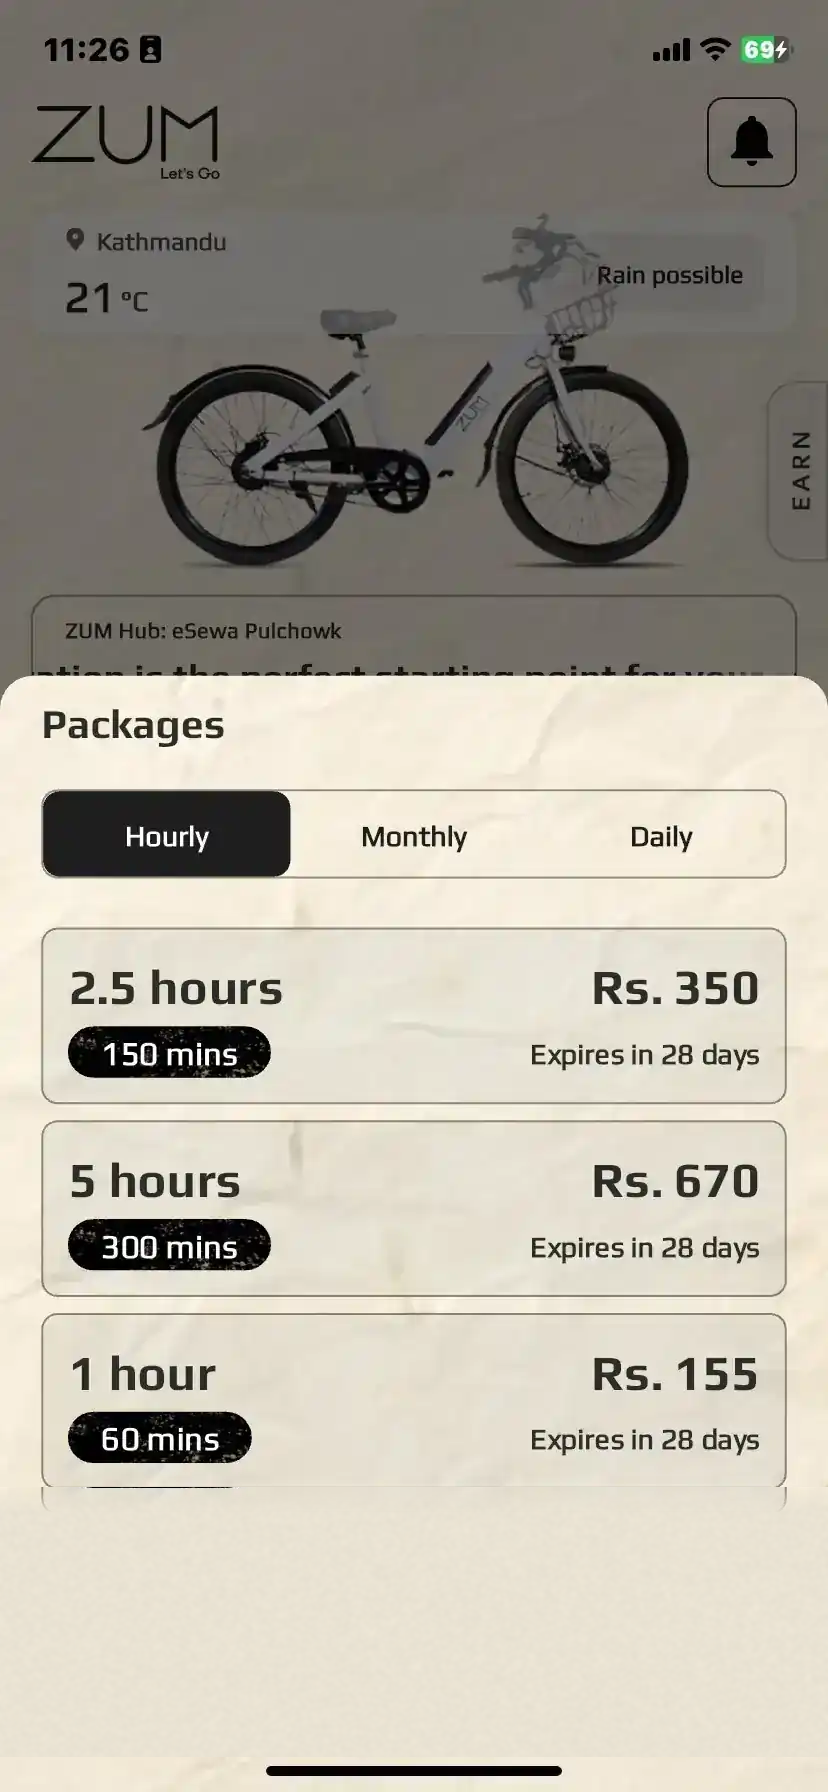
Zum doesn't charge per ride, it charges per minute. Your Balance is a pool of minutes you buy in advance. Every minute you spend on a cycle, per minute is taken from your balance. Top up any time by tapping Balance + on the home screen. Packages start from one hour and go up to a full day pass. Pay As You Go packages and any bonus minutes you collect come with a 28-day window from the day they land in your account — keeping things ticking and your balance ready whenever you need it.
Packages are purchased once and come with 25, 40, or 55 hours of ride time depending on the tier you choose.
📅 How Validity Works: All your minutes share one expiry date. Pay As You Go top-ups come with a 28-day window from the date of purchase. Packages come with longer ones — 60 days for Core, 75 for Pro, and 90 for Ultra.
Each time you make a new purchase, your expiry date is reviewed against what the new purchase would give you. Your date moves to whichever is furthest ahead — so a new purchase never shortens what you already have. If your remaining window is already longer than 28 days, your expiry stays exactly where it is. If you have less than 28 days left, just enough days are added to bring it back up to 28.
Here's how it looks in practice: You buy a Core package on January 15 — your minutes are valid through March 16. On February 15, you top up with a Pay As You Go purchase. You still have 30 days left on your current expiry, which is already more than the 28-day window the top-up offers — so your expiry stays at March 16. Now say on February 25 you top up again. This time you have 20 days left. Since that's less than 28, 8 days are added and your new expiry becomes March 24.
Your current balance is always visible on the home screen.
Special ActionsTokens: When You Need More Than a Ride
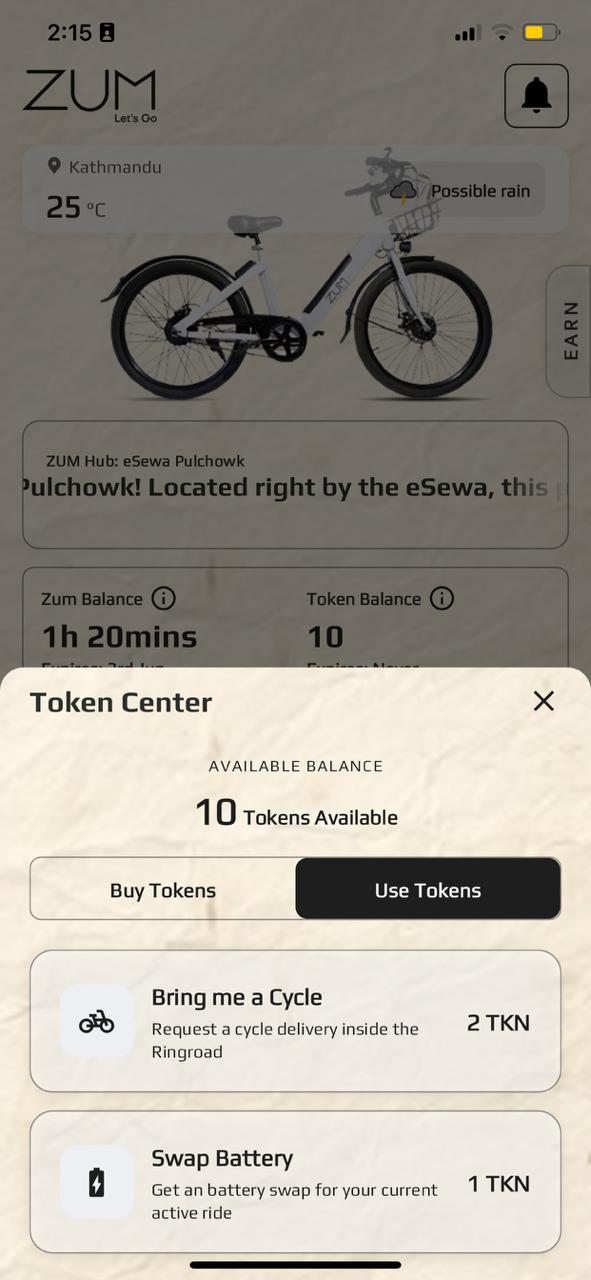
Tokens are a separate balance used for actions outside a regular ride. One token costs Rs. 100 and they never expire. Buy them from the Token Center on the home screen by tapping Token + .
2 Tokens · Docked cycles onlyComing Soon🚲 Bring Me a Cycle
Can't get to a station? Request a cycle delivery anywhere inside the Ring Road, and a Zum team member will bring a cycle directly to you.
1 Token · Active ride onlyComing Soon🔋 Swap Battery
Running low mid-ride? Request a fresh battery and a team member brings it to wherever you are. Your ride continues without losing time.
1 Token · When no station nearby📍 End Ride Outside Station
Need to stop but there's no station? Park safely, take a photo of the cycle, and end your ride remotely. The Zum team reviews the photo and approves or rejects it. Your token will be charged once approved.
⚠️ Boundary Penalties
Inner BoundaryThe cycle beeps and a notification is sent the moment you cross. A 5-minute grace period begins — return inside and nothing is charged. If you don't return in time, 2 tokens are deducted, the motor's power is cut, and every additional 5 minutes outside costs another 2 tokens. The cycle locks itself once it stops.
Outer BoundarySame penalty as the inner boundary, but with no grace period, no beeps, and no notification. The moment you cross, 2 tokens are deducted, the motor cuts, and every additional 5 minutes costs another 2 tokens. The cycle locks itself once it stops.
🪙 All packages include free tokens, Core comes with 1, Pro with 3, and Ultra with 6. Check Settings then Manage Packages to see what your package includes before buying tokens separately.
Before You RideBook a Cycle to Plan Ahead
Don't want to show up at a station and find all the cycles taken? Use Reserve from the home screen. It holds a specific cycle at a station for you so it's waiting when you get there. You can also book another ride while you are already on an active ride.
1
Tap Reserve on the home screen
The map opens showing all stations near you and how many cycles are available at each one.
2
Choose your station and confirm
Tap the station you're heading to. A cycle is locked for you immediately and no one else can take it.
3
Arrive and scan the QR to start riding
Walk up to your reserved cycle and scan the QR on it with the Zum app. Your ride begins.
Your Reserved Cycle Only
Once you have an active reservation, you must scan the specific cycle assigned to you — you cannot scan a different cycle to start a ride. The app will only unlock your reserved cycle.
If you try to scan another cycle while a reservation is active, it will not go through. Cancel your reservation first if your plans change and you want to ride a different cycle.
When browsing cycles to reserve, the cycle with the highest estimated remaining range at that station is highlighted. This helps you pick the cycle that will take you the furthest on a single charge.
⚑ Important: Your balance starts ticking the moment you confirm the reservation, not when you scan the bike. Head to the station straight away so you're not using up minutes before you've even sat down.
Pop-Up Station Notice
Outside Zum Stations, you may also see pop-up station listings on your map. When a rider ends their ride by parking outside a station near you, the app shows nearby users a temporary station view in the map listings showing that cycle’s location.
You can reserve that cycle immediately through the same Reserve flow. Pop-up stations behave like normal stations for reservation purposes, but they are temporary and tied to a specific parked cycle.
📌 Pop-up stations do not push map alerts.
🔋 Note: Cycles with 30% charge or below are not shown in the pop-up station view.
Starting Your RideScan, Check, Go
For an immediate ride, walk up to any available Zum cycle, open the app, and tap Scan QR . Point your camera at the QR code on the cycle. The app runs a few quick checks before unlocking it.
Check 1Is the cycle online?
Each cycle has a built-in IoT device connected to the Zum network. If it shows offline, try a different cycle nearby. This is rare but can happen.
Check 2Is it available?
If someone reserved that Particular Cycle you'll be notified and the cycle stays locked. If it's already in use, you'll be told to scan a different one. Both riders receive automatic notifications.
Check 3Do you have enough balance?
No balance means no ride. You need to add balance before scanning. Once you add minutes, come back and scan again. The cycle will still be there if no one else has taken it.
All clearCycle unlocks and ride starts
Everything checks out. The cycle unlocks with a click, your timer starts, and the home screen switches to active ride view. You're on your way.
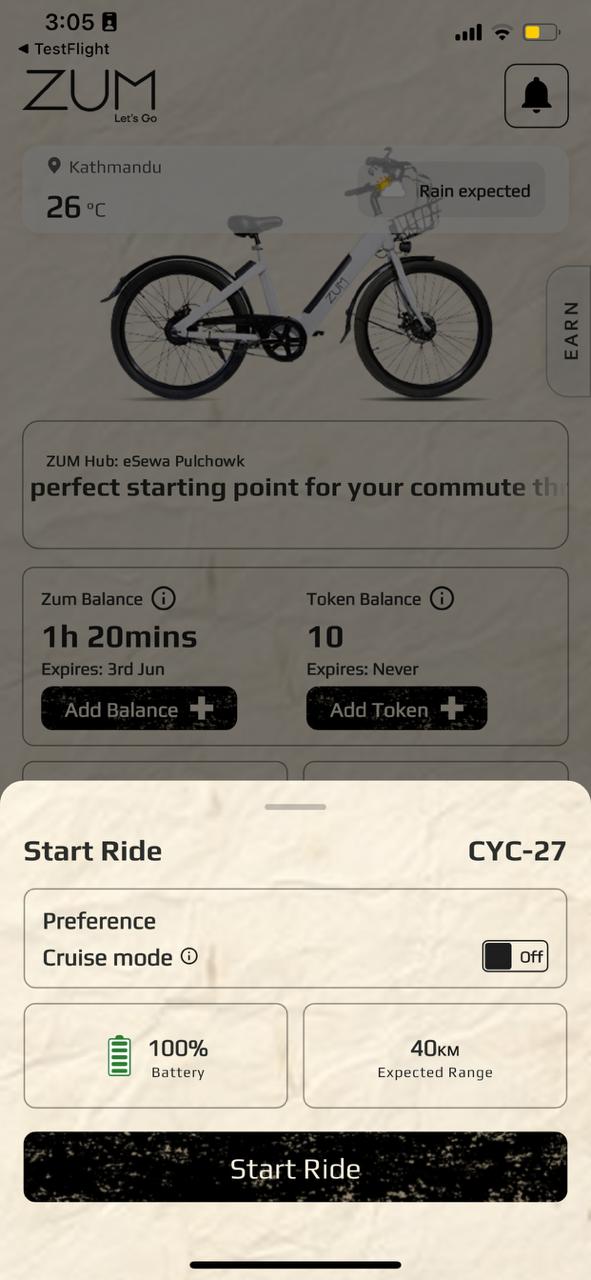
What you see when you scan a cycle QR code
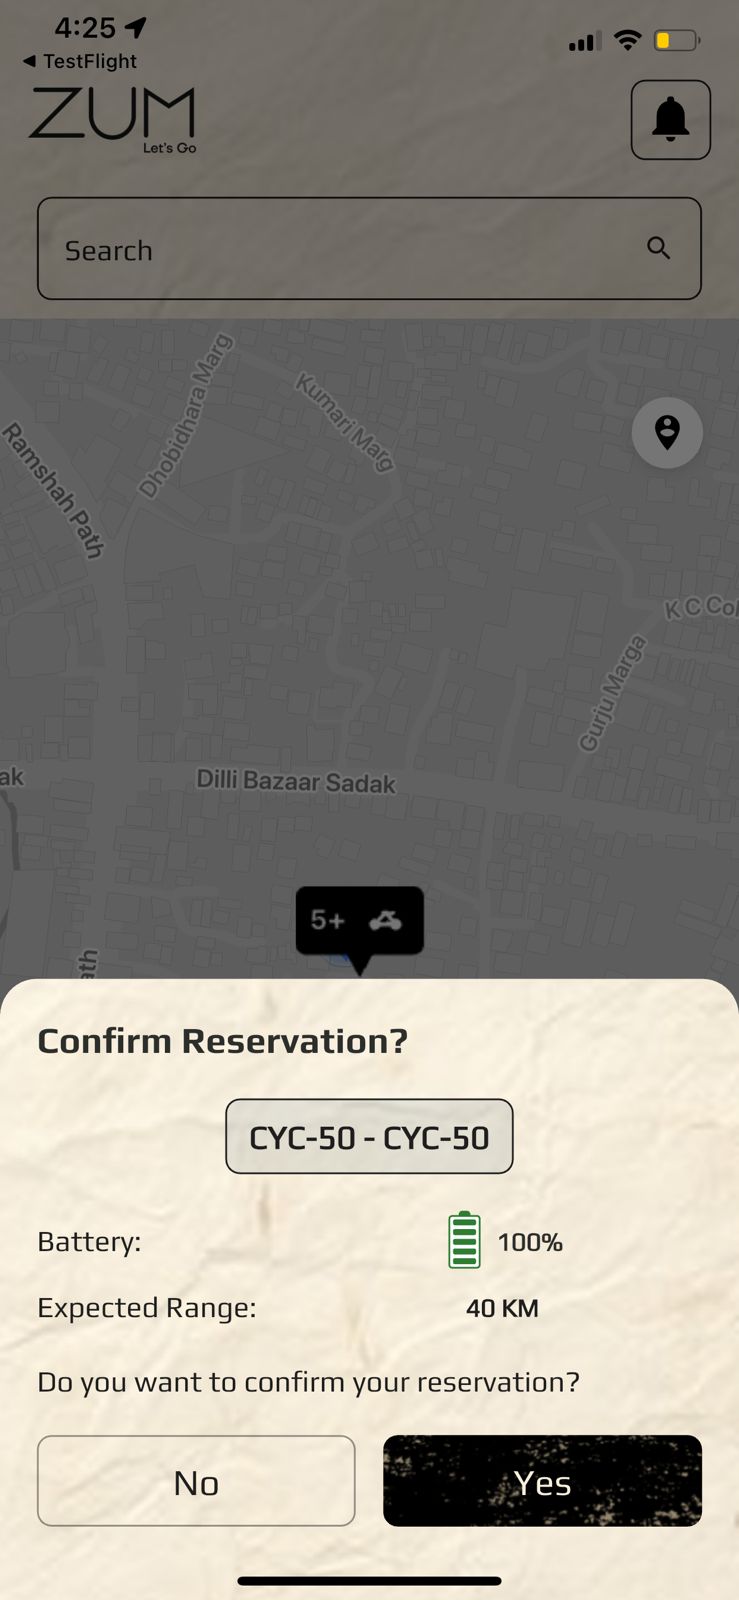
Before the ride begins, the app shows a summary screen with the cycle's battery percentage, the cycle ID number, a Start Ride button to confirm you want to begin, and an estimated range based on the current battery level. This gives you a chance to check if the battery is sufficient for your trip before committing to the ride. If the battery is too low, scan a different cycle.
Scanning your active cycle
While You're RidingTrack Your Cycle and Mid-Ride Controls
Once your ride is active, scan the QR on your own cycle again at any point to get a quick menu of mid-ride options. This is where you control everything without stopping your session.
⚠️ Note — Forced Logout: The system may automatically log you out in certain situations — such as KYC pending approval, account verification requirements, overspending (negative balance), or leaving an active ride cycle unexpectedly. In most of these cases, you will receive a notification clearly stating the reason and you can simply log back in once the situation is sorted.
Blacklisting is an exception — it is reserved for edge cases involving repeated violations and is not something a regular rider will encounter. If you are blacklisted, you will need to contact the Zum team through Login page → Help and Support to regain access.
📍
Track Your Ride
See your live position on the map, the geofence boundary, how long you've been riding, and your route in real time. Every ride records the path you took so you can review it after.
Tip: By tapping the indicator at the top of the home screen, you can see a pulsing Green dot for an Active Cycle and a pulsing Orange dot for a Reserved Cycle, so you always know which is which at a glance.
🔒
Lock the Cycle
Need to stop at a shop or grab lunch? Lock your cycle without ending the ride. Your timer keeps running but the bike is physically secured until you come back.
➕
Top Up Balance
Almost out of minutes? Top up mid-ride without ending your session. New minutes are added instantly and your ride continues uninterrupted.
🏁
End Ride
Ready to stop? Tap End Ride and the app guides you through the correct ending process, at a station or outside one.
🚀 Cruise Mode tip: Check your Stats screen to see your total distance. Once you hit 15 km, Cruise Mode appears automatically in Settings then My Profile then Preference. You don't need to do anything to unlock it.
Know the BoundariesGeofence Zones: Stay in the Green
Zum cycles are designed for use within a set riding area. The app monitors your location in real time during every ride. There are three zones and only one of them costs you nothing.
| Zone | Status | What Happens | Token Cost |
|---|
| Inside Geofence | ✅ Safe | Your ride runs normally. No alerts, no charges, no restrictions, unless there are other violations on the cycle. | None |
| Inner Boundary | ⚠ Warning | The moment you cross the inner boundary, the cycle starts beeping and a notification is sent telling you to return. A 5-minute grace period starts. If you ride back inside before it ends, nothing is charged. If you don't return in time, 2 tokens are deducted and the motor's power is cut. If you keep going by hard pedalling, another 2 tokens are charged every 5 minutes, and the cycle locks itself once it stops for a while. | 2 Tokens after grace, +2 every 5 mins |
| Outer Boundary | 🚫 Violation | Same penalty as the inner boundary, but with no grace period, no beeps, and no notification. The moment you cross, 2 tokens are deducted, the motor cuts, every additional 5 minutes costs another 2 tokens, and the cycle locks itself once it stops for a while. | 2 Tokens immediately, +2 every 5 mins |
📡 The geofence boundary is always visible on your in-ride map. You can see exactly where you are in relation to it at all times. If you accidentally stray near the edge, the app warns you before any charge kicks in.
The 5-minute rule
A wrong turn near the boundary? You have a full 5 minutes to turn around and ride back inside. No token is charged if you make it back in time.
The outer boundary is immediate. Once you cross it, the alarm triggers and 2 tokens are deducted. Keep the map visible if you're riding near the edges of the city.
When Balance Gets LowTime Warnings: The App Keeps You Informed
As your balance runs down during a ride, Zum sends progressively urgent alerts so you always have time to top up or find a station before your minutes run out.
10 min left
📱 Push notification sent to your phone
5 min left
📱 Push notification plus 🔔 one alarm beep on the cycle
2 min left
📱 Push notification plus 📨 SMS sent to your number
1 min left
🚨 Continuous alarm on the cycle, non-stop until you act
Time Up
⚡ Motor power cut, plus a Negative Balance is added to your account. The system waits until the cycle's speed is zero, then de-assigns the cycle from your account. You will need to clear the Negative Balance before you can start another ride.
🔋 30% Battery Notification: When the cycle's battery drops to 30%, Zum sends you a push notification. The motor power gradually reduces, so you will need to use pedal assistance to keep moving. To avoid running out completely, switch to the nearest Zum station and swap onto a fully charged cycle.
After Your Balance Hits ZeroNegative Balance: What Happens and How to Clear It
If your account shows a negative balance after a ride, you'll see a red colour indication on the home screen. This means your balance dipped below zero at some point during or after your session.
What you'll see🔴 Red Colour Indication
Your negative balance amount will appear in red on the home screen. Your ride access is paused until the balance is cleared.
How to fix it➕ Tap to Top Up
Tap the red amount to go straight to the top-up screen. The amount you went over is automatically subtracted from your new balance. Your rides unlock immediately after.
⚡ Once you top up, the negative amount is deducted first and your remaining new balance is available instantly. No need to contact support, the app handles it automatically.
Finishing UpEnd Your Ride: At a Station or Anywhere Else
There are two ways to end a Zum ride. Ending at a station is always free and instant. If there's no station nearby, the app lets you end your ride remotely using a token.
✅ Ending at a Station · Free
1
Ride to any Zum station
Use the in-ride map to find the nearest station.
2
Dock the cycle
If a docking slot is available, push the cycle into the empty slot until it clicks in firmly. If all docking slots at the station are occupied, you can simply leave the cycle parked in the station without docking.
3
Scan the Station Screen QR
Each slot has its own QR. Scan it to officially end your ride. Your stats appear immediately.
📍 Ending Outside a Station · 1 Token
1
Tap End Ride in the app
Select End Ride Outside Station. Your token will be charged once the Zum team approves your parking photo.
2
Park safely and take a photo
Park upright and off the road. Make sure you are not blocking traffic, gates, or pathways. Take a clear photo showing the cycle and its surroundings.
3
Wait for approval
The Zum team reviews the photo. Good parking means the ride ends. Bad parking means you'll be asked to re-park and resubmit.
📸 When parking outside a station, the app also records your cycle's GPS location. Park in a well-lit, clear spot. Your photo is reviewed by a real person and the decision is based on what they see.
🎫 Ending outside station: If you end your ride outside a designated station, a token will be charged once your parking photo is approved by the Zum team.
📌 Pop-Up Station Notice: When you park your cycle outside a station and end the ride, people in your vicinity will see a pop-up "station view" in the map listings showing the available cycle at your parked location, and can reserve it immediately. This keeps the Zum network moving even between Zum stations, so your parked cycle can be picked up and used right away by someone nearby.
Important: Your ride time only ends after the Zum team approves your parking photo. Until then, your timer may continue, so submit a clear photo and wait for approval.
Safety FirstSOS: Help When You Need It Most
Zum has a built-in SOS feature for emergencies during a ride. SOS is only available once you have started a ride. If you have an accident, feel unsafe, or face any urgent situation while riding, the SOS button gives you a fast way to alert the Zum support team, who will inform the police accordingly depending on the incident.
🆘
When to use SOS
Use SOS for genuine emergencies only — accidents, injuries, theft attempts, harassment, or any situation where you feel unsafe during your ride.
📍
What it does
Tapping SOS sends your live location and your cycle's location to the Zum support team, who will then contact the police. Your registered emergency contact is also notified immediately.
⚙️
Where to find it
The SOS option is available from your Active Ride screen and from the mid-ride menu when you scan your own cycle's QR while a ride is in progress.
⚠️ Important: SOS is for emergencies. Misuse of the SOS feature may result in restrictions on your account. For non-urgent issues, use Help and Support from the Settings menu instead.
Stay in the KnowNotifications: Alerts and Support Chat
The notification and chat on the home screen does two things: it shows all your app alerts, and it gives you direct access to a live chat with the Zum support team. Tap the icon any time to read your alerts or start a conversation with us. The chat includes a Tap & Talk feature for quick voice messages, and photo uploads so you can send a picture of the cycle, station, or any issue straight to the support team. Here's what each alert type means.
Auto Ride Alerts
Note: These ride alerts arrive as push notifications and the same details are also shown live on the Active Ride screen while you are riding, so you don't miss anything even if you have notifications muted.
⏱️
Balance Running Low
Sent when your balance drops below a certain threshold while riding. This is your cue to either head to the nearest station to end the ride, or top up immediately via the Add Balance button on the home screen.
🔴
Balance Critical, Ride Will End Soon
A second, more urgent alert when your balance is almost gone. If you don't top up, your ride will enter negative balance territory. Find a station now or add balance from the app immediately.
📍
Zone Warning, You Are Leaving the Ride Area
Triggered when you approach the edge of the geofence. Turn around and head back to a green zone to continue your ride normally.
✅
Ride Ended Successfully
Sent as soon as your ride is closed, either by scanning the Station Screen QR at a station or by ending remotely with a token. Includes your ride duration, distance, and balance used. No action needed.
🔒
Cycle Locked Remotely
If Zum detects unusual activity or the cycle has been stationary too long outside a station, it may be locked remotely. You'll receive this alert with instructions on what to do next.
Account Alerts
🪪
KYC Approved
Your identity verification was successful. Once approved, watch for a notification — when an access window opens for you, you'll be notified and can purchase a package. Act promptly once you receive it, as access windows are limited and open in waves. Until then, no further action is needed.
⚠️
KYC Rejected or Action Required
Your submission could not be verified. The notification will explain why, blurry photo, mismatched details, unsupported document type. Go to Settings then My Profile then Update KYC to resubmit.
💲
Payment Successful
Confirmation that your top-up went through. Shows the amount added and your new balance. If you don't receive this within a minute of paying, check your payment method and try again.
❌
Payment Failed
Your top-up did not go through. No balance was added and no money was deducted. Try again with the same method or switch to a different payment option in Settings. If the issue continues, you can reach out to us directly through the Notification Channel in the app, or contact your bank to confirm there are no restrictions on the transaction.
⚠️ Important note regarding Your Invoices: If you do not see Zum invoice emails in your main inbox, please check your Spam or Junk folder. To ensure you never miss a bill, we highly recommend adding our email address to your whitelist (safe senders list). Most email providers automatically delete messages in the spam folder after 30 days, so whitelisting our ID will prevent your bills from being permanently lost.
General Announcements
📢
New Hub or Station Open
Zum has added a new pickup or drop-off point near you. Open the Maps tab to see where it is.
📱
App Update Available
A new version of Zum is ready to install. Update from the App Store or Play Store to get the latest features and fixes.
🔔 Make sure Zum has notification permissions enabled on your phone. Go to your phone's Settings then Apps then Zum then Notifications and turn them on. Without this, you won't receive balance warnings mid-ride.
More Than RidesServices: Pay Bills From the App
Zum includes a built-in bill payment section under Services on the home screen. Pay your electricity, water, internet, mobile top-up, and more directly from the app — no need to switch to another wallet or banking app.
Utilities💡 Electricity, Water and Mobile
- Electricity via NEA
- Water via KUKL or Community
- Mobile Top-up via NTC or Ncell
- Bank Transfer via NPS
Internet and TV📡 Stay Connected
- Worldlink Internet
- Vianet Internet
- Techminds
- Dishhome, ADSL, NT FTTH
Insurance🛡️ Pay Premiums
Pay insurance premiums directly through Services. No separate portal or app needed.
🧾 Every service payment made through the Zum app is logged automatically. Your payment history is saved inside the app — filter by service or date to find any past transaction or download a receipt.
🎁 Bonus Minutes on Every Transaction: Each time you complete a payment through Services, Zum drops a small bundle of ride minutes straight into your balance — a quiet reward for keeping things in one place. These bonus minutes come with a fresh 28-day window from the day they land, so staying active with Services means your balance keeps ticking with plenty of time ahead of it.
Your AccountMy Profile: Manage Your Account
Go to Settings then My Profile . Your profile card shows your name and phone number at the top, and below it are three tabs: Account, Preference, and Stats.
Account Tab
📧
Email Verification
Email verification is mandatory. Your verified email is used to send invoices for every transaction. When you change your phone number, an OTP is sent to both your verified email and your new number. When you change your email, an OTP is sent to your registered mobile number. Make sure your email is verified before logging out — if it isn't, you may face access issues on your next login. Verifying your email is a one-time step that keeps your account secure.
🔒
Change Password
Enter your current password, then set and confirm the new one. Takes effect immediately. Note: Once you change your password, the app will be logged out and you will need to log back in using your new password.
📞
Change Phone Number
4 steps: Enter your email to receive an OTP, verify the OTP, enter your new phone number, then confirm. Note: Once your phone number is updated, the app will automatically log you out and you will need to log back in using your new phone number.
📧
Change Email
4 steps: Enter your phone to receive an OTP, verify the OTP, enter your new email address, then confirm.
✅
Update KYC
Update your address, documents, photo, or emergency contact at any time. Changes are reviewed before they take effect.
🔒
Biometric Login
Enable fingerprint or Face ID for instant app access. Enter your password once to activate it, then just tap to log in every time after that. Privacy Note: Your Face ID or Fingerprint data is NOT stored by Zum.
🗑️
Delete Account
Permanently close your account. Enter a reason and confirm. This action cannot be undone.
Preference Tab
Control which notifications you receive during and outside of rides. This is also where Cruise Mode enable toggle once you've unlocked it by riding 15 km total. Enable it here before your next ride and the motor holds a steady speed automatically so you don't need to hold the throttle.
Stats Tab
A summary of all your ride data including total rides, distance, time, and average speed. Tap View Ride History to see every individual trip with its route, date, and duration.
SettingsEverything in Settings
Tap the Settings icon from the home screen to access your full account management menu.
Payment Options: Set Up How You Pay
Before your first ride you need to add at least one payment method. Go to Settings then Payment Options to set up and organise how you pay inside the app. Zum supports multiple payment gateways and wallets to ensure you can top up anytime, anywhere.
CityPayDigital Wallet
Pay As You Go1 Tap Payment
What it is: A popular Nepali digital wallet.
How it works: Uses your CityPay wallet balance or linked bank for instant payments.
How to use: Select CityPay > Enter Mobile Number > Enter Wallet PIN & OTP > Confirm.
eSewaDigital Wallet
Pay As You Go
What it is: The most widely used digital wallet in Nepal.
How it works: Deducts funds directly from your eSewa wallet balance.
How to use: Select eSewa > Login with eSewa ID/Password > Review Details > Confirm Payment.
NCHL — ConnectIPS & More
View Supported Banks & Finance Companies
Pay As You Go1-Tap Payment
›
NCHL (Nepal Clearing House Ltd.) powers ConnectIPS and account-to-account transfers in Zum. Select NCHL/ConnectIPS → Enter your NCHL ID → Login to ConnectIPS portal → Authorize with OTP.
Commercial Banks — Class A
Nepal Rastra BankAgricultural Development Bank NepalCitizen Bank InternationalEverest Bank LimitedKumari Bank LimitedGlobal IME BankHimalayan Bank LimitedLaxmi Sunrise BankMachhapuchchhre BankNepal Bank LtdNepal Investment Mega BankNepal SBI Bank Ltd.NIC Asia Bank LtdNMB BankPrabhu Bank Ltd.Prime Commercial Bank Ltd.Rastriya Banijya Bank LimitedSanima Bank LtdSiddhartha Bank Ltd
Development Banks — Class B
Corporate Development Bank LtdExcel Development BankGarima Development BankGreen Development Bank LtdJyoti Bikash BankKamana Sewa Bikash Bank LtdKarnali Development Bank LtdLumbini Bikash Bank LtdMahalaxmi Bikash Bank LtdMiteri Development Bank LtdMuktinath Bikash Bank LtdNarayani Development Bank LtdSaptakoshi Development Bank LtdShangrila Development BankShine Resunga Development Bank LtdSindhu Bikash Bank Ltd
Finance Companies — Class C
Best Finance Company LtdCentral Finance LtdGoodwill Finance LtdGuheswori Merchant Banking and Finance LimitedGurkhas FinanceICFC Finance LimitedJanaki Finance LimitedManjushree Finance LimitedMultipurpose Finance Company LimitedNepal Finance LimitedPokhara Finance LimitedProgressive Finance LimitedReliance Finance LimitedSamriddhi Finance Company LimitedShree Investment and Finance LimitedNepal Infrastructure Bank Ltd (NIFRA)
Wallets
IME PayPrabhu PayNamaste PayCellPayHamro PayMoruMOCO (Focusone)iCashMyPayPaywelldPaisaSajiloPaySulav Pay (N-Cash)QPayDoublePRealPay
NPS — Nepal Payment Solution
View Supported Banks & Finance Companies
Pay As You Go
›
NPS (Nepal Payment Solution) enables direct bank payments in Zum. Select your bank → Login to your bank portal → Authorize with OTP.
Commercial Banks — Class A
Agricultural Development Bank NepalNepal Bank LtdRastriya Banijya Bank LimitedCitizen Bank InternationalEverest Bank LimitedGlobal IME BankKumari Bank LimitedLaxmi Sunrise BankMachhapuchchhre BankNabil BankNepal Investment Mega BankNIC Asia Bank LtdNMB BankPrabhu BankPrime Commercial Bank Ltd.Sanima BankSiddhartha Bank
Development Banks — Class B
Excel Development BankGarima Bikash BankGreen Development BankJyoti Bikash BankKamana Bikash BankLumbini Bikash BankMahalaxmi Development BankMiteri Development BankMuktinath Development BankSaptakoshi Development BankShangrila Development BankSindhu Bikash Bank
Finance Companies — Class C
Best Finance Company LimitedGoodwill Finance LimitedICFC Finance LimitedManjushree Finance LimitedNepal Finance LimitedReliance Finance LimitedCentral Finance LimitedGurkhas Finance LimitedMultipurpose Finance Company Limited
📧 Email is Mandatory: A valid email address is required for all accounts. Your invoice is automatically sent to your registered email after every transaction.
What "mandatory" means here: You cannot complete account setup or make any payment without a verified email address on file. This is not optional — the app will prompt you to add one if it is missing. The email is used solely to deliver your transaction records and is not shared with third parties.
🏦 What is a Mandate? When you register 1-Tap Payment via NCHL or CityPay, you are creating a payment mandate. A mandate is a standing authorisation you give to Zum to debit a fixed or variable amount from your linked bank account on your request, without requiring you to log in to your bank each time. This means once your mandate is set up, every top-up happens instantly with a single tap. Your mandate can be viewed or cancelled at any time through your bank's portal or the NCHL platform.
Fastest Way to PayRegister 1-Tap Payment: Link Your Bank Account
This feature links your payment account directly to Zum through NCHL (bank accounts) or CityPay (digital wallet). Once set up, every top-up happens with a single tap. No extra steps ever again.
1
Settings then Register 1-Tap Payment
Opens the 1-Tap Payment registration screen. Choose your method, NCHL (to link your bank account through ConnectIPS) or CityPay (to link your CityPay digital wallet).
2
Confirm your bank details match
Your Zum phone number and email must match what's registered with your bank. If they don't match, you'll get a notification to resolve the mismatch first before continuing.
3
Authorise through your bank
Your bank sends a confirmation. Approve it and your account is linked. 1-tap payments are active immediately.
Via NCHL🏦 Bank Account
Link your bank account through NCHL/ConnectIPS. Supports 51 banks and finance companies. Your bank details are never stored in the Zum app.
Via CityPay📱 Digital Wallet
Link your CityPay wallet for instant 1-tap top-ups. No bank account required — your CityPay balance is debited directly with a single tap.
Speed⚡ Done in seconds
Once registered through either method, every top-up completes in seconds. No extra authentication needed at checkout ever again.
NCHL Supported
View Supported Banks & Finance Companies
Pay As You GoSubscription1-Tap Payment
›
NCHL (Nepal Clearing House Ltd.) powers 1-tap payment in Zum. Your bank must be on this list to register.
Commercial Banks — Class A
Nepal Rastra BankAgricultural Development Bank NepalCitizen Bank InternationalEverest Bank LimitedKumari Bank LimitedGlobal IME BankHimalayan Bank LimitedLaxmi Sunrise BankMachhapuchchhre BankNepal Bank LtdNepal Investment Mega BankNepal SBI Bank Ltd.NIC Asia Bank LtdNMB BankPrabhu Bank Ltd.Prime Commercial Bank Ltd.Rastriya Banijya Bank LimitedSanima Bank LtdSiddhartha Bank Ltd
Development Banks — Class B
Corporate Development Bank LtdExcel Development BankGarima Development BankGreen Development Bank LtdJyoti Bikash BankKamana Sewa Bikash Bank LtdKarnali Development Bank LtdLumbini Bikash Bank LtdMahalaxmi Bikash Bank LtdMiteri Development Bank LtdMuktinath Bikash Bank LtdNarayani Development Bank LtdSaptakoshi Development Bank LtdShangrila Development BankShine Resunga Development Bank LtdSindhu Bikash Bank Ltd
Finance Companies — Class C
Best Finance Company LtdCentral Finance LtdGoodwill Finance LtdGuheswori Merchant Banking and Finance LimitedGurkhas FinanceICFC Finance LimitedJanaki Finance LimitedManjushree Finance LimitedMultipurpose Finance Company LimitedNepal Finance LimitedPokhara Finance LimitedProgressive Finance LimitedReliance Finance LimitedSamriddhi Finance Company LimitedShree Investment and Finance LimitedNepal Infrastructure Bank Ltd (NIFRA)
Wallets
IME PayPrabhu PayNamaste PayCellPayHamro PayMoruMOCO (Focusone)iCashMyPayPaywelldPaisaSajiloPaySulav Pay (N-Cash)QPayDoublePRealPay
Manage Your PlanPackages: Manage Your Plan
Before you purchase — eligibility
To purchase a package on Zum, you'll need to meet a few basic conditions first:
- Your KYC must be approved.
- Your email must be verified.
- You must have a linked payment method.
- An access window must be open for you. Zum releases access windows in waves — when yours opens, you'll get a notification and the purchase option becomes active. Act promptly once notified, as access windows are limited. If you miss yours, a new access window will open after a certain time and you'll be notified when it does.
📌 Access windows are kept matched to the available fleet so every rider who purchases a package can find a cycle when they need one.
Your packages
| Package | Hours | Free Tokens | Validity | Price |
|---|
| Core | 25 hrs | 1 | 60 days | Rs. 2,995 |
| Pro | 40 hrs | 3 | 75 days | Rs. 3,995 |
| Ultra | 55 hrs | 6 | 90 days | Rs. 4,995 |
Each package is a one-time purchase. Once your validity window closes, unused minutes are forfeited. Tokens never expire.
Day Package
The Day Package lets you book a single cycle for one full day at a station of your choice.
1
Book at least 1 day in advance — same-day booking is not supported. You can book up to 30 days ahead.
2
Select any available station.
3
You may change your booking date once, at least 48 hours before your scheduled date.
4
Once booked, a booking pill appears in the app showing your assigned station and cycle number.
📌 Please note that same-day booking is not currently supported. Book at least a day in advance to ensure your cycle is available.
Need HelpHelp and Support: We're Right There in the App
Something went wrong or you have a question? Go to Settings then Help and Support and reach the Zum team directly without leaving the app.
1
Settings then Help and Support
The support form opens directly inside Zum. No browser, no separate app required.
2
Choose a category
Use the dropdown to pick the type of issue you're reporting, ride problem, payment question, account issue, and more.
3
Write your issue and send
Describe what happened and tap Send. The Zum team will get back to you as quickly as possible.
💬 The support form opens directly inside Zum. Describe what happened and tap Send. The Zum team will get back to you as quickly as possible.
🕙 Support Hours: Zum support is available from 10:00 AM to 5:00 PM. For any queries, please reach out through the Help and Support section in the app.